
How to Solve the Rail Forest Puzzle in Sea of Stars – Full Rail Forest Walkthrough
You'll notice a specific trend in the puzzles here.

The Rail Forest in Sea of Stars’ Throes of the Watchmaker DLC brings several new puzzles to the game. Some are quite obvious and straightforward, while others are way too confusing.
Here are all the solutions to the Rail Forest puzzles in Sea of Stars’ Throes of the Watchmaker.
Complete Rail Forest Puzzle Solutions in Sea of Stars – Full Walkthrough
Rail Forest Puzzle #1


The Rail Forest path is pretty straightforward, apart from the puzzles. You’ll go through the hoops similar to how you went through the Oubliettes and the Clockwork Plains.
You’ll eventually find yourself stuck next to a cliff where there’s a room on the side. Head inside, and you’ll see a box with a hole in the middle, similar to the keyholes you’ve encountered previously.
Interact with it to miniaturize your team and solve the puzzle inside.


Inside, you’ll see a big symbol with five circular layers. Turn each circular layer to form the image above. It should look like a triangle door-like symbol or something that mirrors the clock on the ground in the Town of Horloge.


Once you finish the puzzle, go up the stairs from either side of the room and grab the Time Rune III on top. Go outside and go through the Rail Forest again.
Rail Forest Puzzle #2


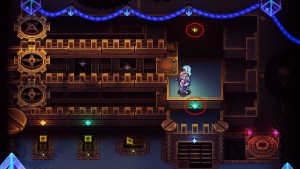
Next, you’ll encounter rail tracks with two purple squares next to a diamond icon. This is very similar to the puzzle back in the Oubliettes. You’ll have to place something on these squares to finish the puzzle.
On the top floor, you’ll see two pathways on the left and right. You’ll notice deformities on the ground and the railings underneath. There are also two large platforms with railings on top on each side.
On the right side, you can push both of the platforms to the top and to the middle. Do both of them at the same time, and once you reach the end, the two platforms will position themselves perfectly so that the last one can be dropped to the center.


For the left side, there are two platforms as well, but it is a little different. If you look at the image above, you’ll see a tiny difference where a platform will not fit when pushed on the top side.
If you see the red rectangle on top, this is where you want the platform to land as you are pushing it from the left side. To do this, you want to push both boxes to the top but next to each other (vertically). Push the box below to the other side, and it should hit the corner of the terrain, stopping it perfectly. Push it down the cliff and place the second platform on the square.
This should connect the railings, and you should be able to pass through it and proceed to the next area.
Rail Forest Puzzle #3


Once you see the area with a bunch of broken railings in the center, you’ll need to fix it like the picture above. There are two switches on the right side of the area. Each switch corresponds to a specific railing seen at the center.


If you go through the other side, you’ll also see a lever to move the railings up. Clear the enemies near the lever first before anything else.
Refer to the first image in this section and use the switches to ensure no railing is blocking the straight pathway. Go down the ladder and climb up the railings once you have connected the path. Run through the railing; this should be the easiest of all the puzzles in the Rail Forest.
Rail Forest Puzzle #4


For the fourth and final puzzle, you’ll eventually see another contraption you can enter. Do so and you’ll see a complex puzzle revolving around switches, boxes, and moving platforms.


Pay attention to the sun (gold) and moon (teal) icons. When switched, the sun icon on top of the switch will interact with all the objects or platforms with the sun next to it. The same goes for the moon switch.
As for the third switch, switching it will alternate between the platform and the boxes as seen in the image on two images above. You aim to push the three boxes to the cogs and away from the platforms.
First, press the sun switch so the path gets cleared for the first box. Go to the side and use the little air duct to lift yourself up to the top floor. Run to the box and push it to the left.
Second, go back down and use the switch to turn to the platform side. Press the sun switch so it closes the platform, and then go back up the platform. This should take you to the middle level and push the box through.
Third, go back down and go to the platform switch. Press the moon switch to remove all the platforms so you can get to the very first level. Use the other switches to remove any blocked paths.
Go to the air duct and land on the first level. Push it and it should finish the puzzle. The only way down from this side is to go to the right side of the platform and jump down to the water.
After finishing the puzzle, you’ll unlock the path going up the Rail Forest and see the main tracks. You’ll get chased by a train and enter a cutscene. This starts the boss fight, and you’ll have to beat the train to survive.
If you aren’t prepared yet, you can go back by using the purple “mine cart” to traverse back to the start of the Rail Forest. You can use the same mine cart to go back up. The train boss is tough. It occasionally imprisons one of your party members, and if you don’t break them out by attacking the cell, you’ll lose them immediately during the fight.
Make sure you are fully rested and have some items ready for healing and reviving. Go through your equipment; you might have found better gear in the Rail Forest since there are some chests here that are hard to miss.